

Small hydraulic cylinder seal kit: How to choose, measure and rebuild
A leaking hydraulic cylinder may be repairable with a new seal kit if its rod, barrel, piston and retaining components remain serviceable. The replacement seals need to match both the cylinder's dimensions and its operating conditions.
Choosing a small hydraulic cylinder seal kit therefore involves more than matching the bore size. Rod diameter, seal profiles, groove dimensions, hydraulic fluid, pressure and temperature all affect fit and performance.
The first task is to identify the cylinder and the cause of the leak. That helps establish whether resealing is appropriate and which parts the repair requires.
Identify and measure the cylinder before ordering
Start with the manufacturer's name, cylinder model, serial number and original repair-kit number. These records can help distinguish between cylinders that look alike but use different sealing arrangements.
Check the parts drawing and service manual before opening the cylinder. Internal measurements require safe disassembly. Isolate the equipment, mechanically support loads and relieve stored energy using the approved procedure before dismantling or moving components.
Measure the bore, rod and installation dimensions
The bore is the internal diameter of the barrel. The rod diameter is measured across the piston rod's finished surface. The barrel's outside diameter does not establish its bore size.
Use calipers for preliminary identification and suitable micrometers or bore gauges for measurements that require greater precision.
| Measurement | What to record |
|---|---|
| Bore diameter | Measurements at several depths and in two perpendicular directions to check for taper or ovality |
| Rod diameter | Measurements at multiple positions, noting both nominal dimensions and worn areas |
| Stroke | Difference between fully extended and retracted positions, using consistent reference points |
| Mounting dimensions | Mounting style, pin diameters and relevant center-to-center distances |
Use drawings and undamaged surfaces to help identify the nominal size. When assessing whether the cylinder can be rebuilt, also measure worn areas and compare them with the manufacturer's service limits. Avoiding a damaged section during measurement can conceal the reason a replacement seal would fail.
DALLAST's hydraulic cylinder measurement guide provides additional measurement and ordering guidance. The drawing for the particular cylinder should determine the required dimensions and tolerances.
Inspect the grooves and sealing surfaces
Check the rod for scratches, corrosion, bending and damaged chrome plating. Inspect the barrel, piston and gland for wear, scoring and damaged sealing surfaces.
For each removed seal, record its inside diameter, outside diameter, width, profile and identifying marks. Treat these measurements as identification clues. Used seals may have swollen, shrunk or taken a permanent compression set.
Compare the seal information with the actual metal grooves and the manufacturer's dimensional requirements. The replacement must match the sealing geometry as well as the nominal bore and rod sizes.
Understand the kit contents and material choices
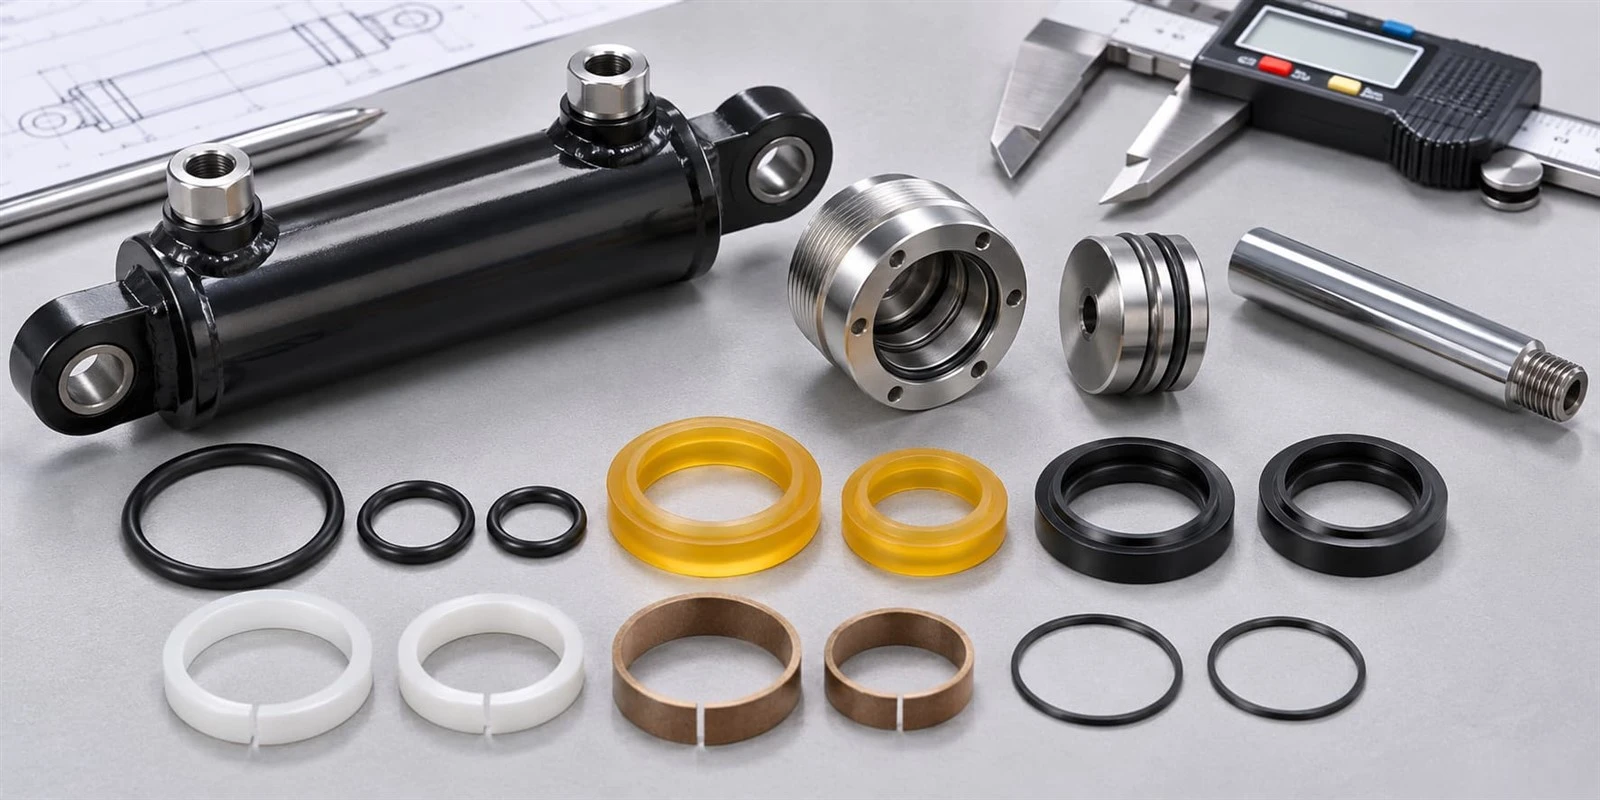
A repair kit may include pressure seals, static seals, wipers and guide components. Contents vary with the cylinder design and the supplier's definition of a complete kit.
Check the component list
| Component | Main function |
|---|---|
| Piston seal | Controls leakage across the piston |
| Rod seal | Controls oil leakage along the moving rod |
| Wiper or dust seal | Limits contamination entering on the retracting rod |
| Wear ring or guide ring | Guides moving parts and helps prevent metal-to-metal contact |
| O-ring | Commonly seals static interfaces; some designs use O-rings dynamically |
| Backup ring | Helps support a seal against extrusion |
| Retaining hardware | Secures components where specified by the cylinder design |
Request a component list or bill of materials before buying. Wear rings, backup rings and retaining hardware may need to be ordered separately.
DALLAST's hydraulic cylinder parts category includes components such as rods and tubes. Ask separately whether a seal kit or individual sealing components are available for your cylinder.
Select the exact compound, not just the material family
| Material | Common reasons for selection | What to verify |
|---|---|---|
| NBR, or nitrile rubber | Compatibility with many mineral-based hydraulic oils and economical general use | Exact fluid, temperature range, hardness and seal design |
| PU, or polyurethane | Abrasion and extrusion resistance in dynamic seals | Compound, operating conditions and extrusion clearance |
| PTFE | Low friction and resistance to many chemicals | Fillers, energizer material, installation requirements and complete assembly limits |
| FKM, or fluoroelastomer | Resistance to many oils and suitability for elevated temperatures | Compound-specific fluid compatibility and low-temperature performance |
Temperature figures need a named compound and application context. For example, Parker's catalog lists N0674 nitrile and P5010 polyurethane compounds with temperature guidelines of -30°C to +100°C, and V0747 FKM at -20°C to +200°C. The catalog also explains that suitability depends on design and operating conditions.
These examples do not establish the operating range of an entire seal kit. Check every component in the assembly, including PTFE fillers and elastomer energizers, against the actual hydraulic fluid and operating temperature. Ambient temperature alone is insufficient.
Match the seal profile and gland arrangement
O-rings are widely used for static sealing and can also work in engineered dynamic applications. Their suitability depends on gland geometry, material, pressure and extrusion clearance.
U-cup and other lip seals are common in rod and piston applications. Their pressure-responsive lips must fit the intended groove and operating conditions. Higher system pressure alone does not establish which profile or material is suitable.
Select the wiper as part of the complete rod-sealing arrangement. A double-lip design is not a universal upgrade: check the gland and rod-seal combination with the supplier before substituting it.
Cross-reference the kit and confirm fitment
An original kit number is a useful starting point, but check the cylinder model and production revision it covers. Manufacturers may change sealing arrangements between generations.
Two cylinders with the same bore and rod diameters can still require different seal profiles, groove widths or component combinations.
Ask the supplier to compare the proposed kit's drawing and component list with your cylinder records. A cross-reference should explain the dimensional and material match rather than rely on a shared brand name or approximate diameter.
DALLAST's seal kit supplier guide discusses additional information buyers can provide when requesting a fitment review.
Compare OEM, aftermarket and custom kits
| Kit type | Potential benefit | What still needs checking |
|---|---|---|
| OEM kit | Intended for a specified original cylinder configuration | Model, serial range, revision and included components |
| Aftermarket kit | May offer lower cost or easier availability | Dimensions, profiles, materials and documented compatibility |
| Custom kit | Can address discontinued or modified equipment | Verified hardware dimensions, drawings, material selection and sample approval |
Request a current quotation for the exact kit and cylinder configuration. Compare the included components, materials, quantity and shipping costs.
For custom kits, also ask about engineering, tooling or setup charges, minimum order quantity, sample approval and production lead time. Compare the total repair cost with the cost and availability of a replacement cylinder.
When the kit arrives, check its identification and packing list before installation. Keep the components protected from contamination until they are needed.
Store replacement seals correctly
Keep seals in clean, dry conditions within the supplier's storage requirements. Protect them from sunlight, ozone, incompatible chemicals and deformation.
Shelf life varies by polymer, compound and supplier policy. Avoid applying one expiry period to every seal in an MRO inventory. Record material identification, batch information, manufacturing date where available and the supplier's storage or shelf-life instructions.
Rebuild a serviceable cylinder using its maintenance instructions
Confirm that the cylinder is designed to be serviced and that the required manual, tools and replacement parts are available. Follow any manufacturer requirement for qualified technicians or authorized repair.
Before disassembly, shut down and isolate the equipment, support loads mechanically and control stored energy. Verify isolation before starting work. Where OSHA's lockout/tagout standard applies, it requires hazardous stored or residual energy to be rendered safe and isolation to be verified.
Stopping the pump does not prove that the cylinder is depressurized. Do not loosen couplers or crack hydraulic lines as an improvised pressure-release method. Follow the model-specific procedure, and stop if the pressure condition is uncertain.
The following sequence outlines the work to plan. Closure removal, seal orientation, torque values, bleeding and testing must come from the applicable service instructions.
Prepare the tools and work area
Depending on the design, the repair may require:
Calipers, micrometers and suitable bore gauges.
Seal removal and installation tools that will not damage sealing surfaces.
Appropriate retaining-ring pliers.
A soft-jaw vise or dedicated cylinder fixture.
A torque wrench and specified sockets or gland tools.
Compatible assembly lubricant or approved hydraulic fluid.
Protective sleeves for threads and sharp transitions.
Approved cleaning materials and lint-free cloths.
Use a brass drift or nylon block only where the service instructions permit it. Do not use either to force precision components into position.
Required pressure testing needs suitable rated equipment and personnel qualified to perform the test.
1. Remove and secure the cylinder
After completing isolation, load support and pressure verification, remove the cylinder according to the equipment manual.
Cap open hydraulic connections to limit contamination. Secure the cylinder in a fixture that supports it without crushing or deforming the barrel.
2. Open the cylinder using the specified procedure
Identify the closure arrangement before applying force. The cylinder may use a threaded gland, retaining ring, tie rods or another design.
Remove the retaining components with the specified tools and sequence. Check retaining-ring position and groove condition. If a component remains loaded, damaged or difficult to release, investigate rather than forcing it.
Withdraw the rod and piston assembly carefully to protect the bore and sealing surfaces.
3. Clean, inspect and measure the components
Use approved cleaning materials, then inspect:
Barrel scoring, corrosion, ovality and surface damage.
Rod bending, pitting, plating loss and thread damage.
Piston and gland condition.
Guide and wear-ring condition.
Gland threads, retaining grooves and other closure components.
Compare measured wear with the manufacturer's limits. A seal kit cannot compensate for hardware that is outside the permitted dimensions or condition.
4. Install the replacement seals
Check each component against the approved drawing and kit list.
Use compatible lubricant and appropriate installation tools. Protect rod threads, shoulders and sharp edges with suitable sleeves.
Follow the instructions for the exact seal profile and assembly. Avoid twisting, cutting, overstretching or folding a seal beyond its installation limits. Use the specified drawing to determine orientation rather than assuming the previous installation was correct.
5. Reassemble and check the retainers
Reinstall the piston, rod, gland and closure components in the prescribed sequence.
Use the manufacturer's torque values and locking procedures. A generic tightening value is unsuitable for an unidentified cylinder.
Check that retaining rings are fully seated and that the assembly passes the movement checks specified in the manual. Investigate unexpected resistance before pressurizing the cylinder.
6. Bleed and test according to the manual
Reconnect the cylinder and restore the system using the approved procedure. Complete the specified bleeding and controlled functional checks before the required operating-pressure tests.
Keep clear of moving components and pressurized connections. Never use your hands to search for a hydraulic leak.
Qualified personnel should perform any required pressure or internal-leakage testing. Record the results and complete the manufacturer's acceptance checks before returning the equipment to service.
If leakage or abnormal movement persists, stop and investigate the component condition, seal selection, contamination and assembly.
DALLAST's hydraulic ram reconditioning guide provides supplementary reading. Use the cylinder's own service instructions for the repair procedure.
Diagnose recurring leaks before replacing seals again
A repeat failure can indicate damaged hardware, contamination, misalignment or a hydraulic circuit problem. Replacing the same seals again without checking the cause may repeat the failure.
| Symptom | Possible causes | Checks to arrange |
|---|---|---|
| Oil around the rod | Worn rod seal, damaged rod surface or misalignment | Inspect the rod, guides, alignment and seal |
| Oil around the gland | Damaged static seal, sealing surface or closure components | Inspect the gland, static seals and retaining arrangement |
| Drift under load | Piston leakage or leakage elsewhere in the circuit | Use a controlled diagnostic procedure |
| Leakage soon after rebuilding | Incorrect profile, installation damage, contamination or worn hardware | Verify the kit and measure the components |
| Jerky or uneven movement | Air, contamination, binding or control problems | Inspect the cylinder and hydraulic circuit |
Drift alone does not prove that the piston seal is leaking. Parker's maintenance guidance notes that other circuit components can produce similar symptoms. Use the prescribed diagnostic method before deciding which part to replace.
Account for the application
| Application | Maintenance priorities |
|---|---|
| Log splitters | Inspect rod condition, piston guides and pressure-relief operation; investigate overloads and pressure spikes |
| Snow plows | Check low-temperature seal suitability, corrosion, wiper condition and exposed rod cleanliness |
| ATV and compact lifting systems | Inspect mounting pins, bushings and rod alignment |
| Workshop presses | Stay within rated capacity and pressure; inspect sealing and structural components after overload concerns |
| Mini excavators | Maintain wipers, protect rod surfaces and monitor abrasive contamination |
Stop for further assessment when hardware is damaged
Arrange professional inspection if the cylinder has deep scoring, substantial plating loss, a bent or cracked rod, significant barrel wear or deformation, or damaged gland threads or retaining grooves.
Repeated leakage after a correctly performed repair also warrants further diagnosis. An unknown trapped-pressure condition must be resolved safely before any disassembly continues.
If the repair approaches the cost of replacement, compare the complete costs, delivery times and expected serviceability of both options. DALLAST's small hydraulic cylinder range provides a starting point for a replacement inquiry, subject to confirmation of the required configuration.
Frequently asked questions
How do I know which small hydraulic cylinder seal kit fits?
Start with the cylinder model, serial number and original kit number. Confirm bore and rod dimensions, seal profiles and groove geometry against the proposed kit's drawing and component list. Matching bore size alone is insufficient.
How do you measure hydraulic cylinder seals correctly?
Record inside diameter, outside diameter, width, profile and markings. Compare used-seal measurements with the metal grooves and original specifications because worn seals may be distorted. Separately measure hardware wear against the manufacturer's service limits.
What should a seal kit contain?
Depending on the design, it may include piston seals, rod seals, wipers, O-rings, backup rings and wear rings. Retaining components may be included or sold separately. Check the bill of materials against the parts needed for the repair.
How do you stop a hydraulic cylinder from leaking?
Identify the leak source and inspect the rod, barrel, gland, seals and circuit. Replace worn seals when the hardware remains serviceable. Damaged surfaces, excessive wear, misalignment or circuit faults require attention as part of the repair.